
How to place electrodes when using TENS machine in labour
You will find that using your TENS machine is easy, but knowing how to perfectly position your electrode pads so that they give you most benefit is important. You’ll need your partner or care provider to position the electrodes for you. Here’s a guide to positioning the electrodes for use with your TENS machine:
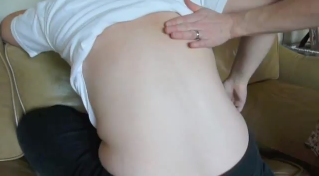
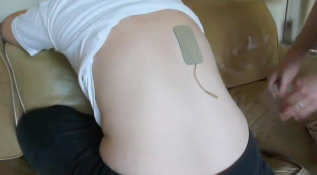
1. Find the position for the first electrode
The first electrode pad is going to be placed three finger widths down from your shoulder blade, and one finger width out from your spine. If you move your arm backwards, your shoulder blade will move backwards and stick out, so it will be easier to measure down from. Just measure three finger widths down from the shoulder blade, one finger width out of your spine, and then place the electrode pad there securely with the wire leading down.
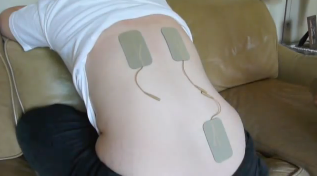
2. Match the second electrode on the other side
To place the second electrode, you can either go through the same process as you did for the first, or just place it symmetrically across from the first electrode on the other side of the spine, so that’s position is matched up. Again, have the wire leading down.

3. Third electrode goes just above the sacrum
The lower set of electrodes are going to be placed right down low, with the lower edge of the electrode lined up with the top of your bottom – low down on the sacrum. Again the electrode will be placed one finger width away from the spine. The wire should be pointing up.
4. Fourth electrode opposite the 3rd
Again, match the electrode on the other side so that it is symmetrical and have the wire pointing up.
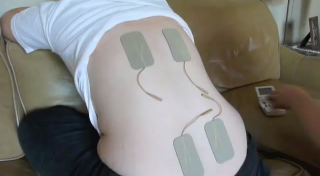
5. Attach leadwires to the TENS machine
You can then go ahead and attach the leadwires to the ObStar TENS machine. You will attach the black pins to the electrodes on the left of the spine, and the red pins to the electrodes on the right of the pin. The top set of electrodes will attach to the right-hand channel on the TENS machine. The lower set of electrodes will attach to the left-hand channel on the TENS machine

Some general tips about care of your electrodes
[unordered_list style=”green-dot”]- The electrodes are very long-lasting, but if they get crumpled, then they won’t cover the surface area on your back properly and will be much less effective.
- Always replace the plastic backing to the electrodes when they’re not in use.
- You can refresh the adhesive with a light mist of water and then leave to air dry.
- If you get in and out of the shower when you’re in labour, make sure you thoroughly dry the skin that the electrodes will be placed on or they won’t stick to your skin securely.
- Let us know if you need help!
Thanks to Nature’s Gate UK for the images.